bookmark_borderIKEv2 VPN with routerOS and Windows 10/11: IKE authentication credentials are unacceptable

If you have encountered a problem with a IKEv2 connection with Windows 10 or Windows 11 and the error message states:

IKE authentication credentials are unacceptable

The error looks a little bit different from our routers side:

oct/16 10:50:55 ipsec,error identity not found for peer: DER DN: CN=1114XXXXX,C=,ST=,L=,O=,OU=,SN=1114XXXXX

There might be multiple certificates installed to your machine and Windows is unable to select the proper certificate for authentication (If you didn’t install any certificates in your computer the above error is most likely not related to this article. Please follow the original setup of your VPN tutorial to complete this step). But don’t worry this is easy to fix. We can pin a certificate authority (CA) that has signed a certificate to a specific VPN connection.

First we need to have the CA certificate as a file on the clients machine. You can either export the CA-certificate from the computers certificate store (certmgr.exe) or you can download the file from your router or the location you have created the CA-Certificate, server-certificates and user-certificates.

Second step is to pin the CA-certificate to our VPN connection. Open PowerShell (do not open as “Administrator” since we want to set the certificate pinning in user context) and type in the following (please make sure you replace the VPN name and path to CA-certificate):

Set-VpnConnection -Name "My VPN" -MachineCertificateIssuerFilter 'C:\CA-files\my-ca.cer'

After you have completed the above steps your VPN should start working.

bookmark_borderHowto check your M365/Exchange Online environment for messages exploiting CVE-2023-23397

You might have heard about CVE-2023-23397 a vulnerability targeting Microsoft Outlook. The exploit can be triggered without user interaction. The vulnerability seems easy to exploit. Fortunately, you can simply protect yourself: Update Outlook/Office Apps and you are good.

But how can we make sure we have not been exploited by that vulnerability? Microsoft has released a script for local Exchange installations as well for Exchange Online/ Microsoft 365.

This blog post shows how to use the Script to identify potential malicious mails in M365.

First we need to start Powershell as administrator. After that we install the AzureAD module:

PS C:\Users\Administrator> Install-Module AzureAD

Powershell will then ask if the module should be installed from an external source. Please select Yes (Y) here.

Next, we need to install the Exchange Online module:

PS C:\Users\Administrator> Install-Module -Name ExchangeOnlineManagement -RequiredVersion 3.1.0

Powershell will then ask again if the module should be installed from an external source. Please select Yes (Y) again.

The script used in the following step can be downloaded from here.

Now we need to create an AzureAD application, which is needed to check the mailboxes:

PS C:\Users\Administrator\Downloads> .\CVE-2023-23397.ps1 -CreateAzureApplication

Depending on the Powershell configuration, it may be necessary to confirm again that the script may be executed. You can either chose (M) or (A). I recommend chosing M.

A new window will open to log in to M365 as a global administrator or application administrator.

If your output is similar to the following creating the helper application has worked:

CVE-2023-23397 script version 23.03.15.2119

Prompting user for authentication, please minimize this window if you do not see an authorization prompt as it may be in the background

Adding user adminuser@yourtenant.com as owner of CVE-2023-23397Application

Setting Azure AD Permissions

Assigning Necessary Azure AD Service Roles
Application created with required permissions. Client ID: xxxxxx-xxxx-xxxx-xxxx-xxxxxxxxxxxx

After this step we now can start the investigation. We need to connect to Exchange Online first:

PS C:\Users\Administrator\Downloads> Connect-ExchangeOnline

You might need to re-authenticate at this point to M365. (I did not need to log in again at this step)

And then we can start the Powershell script to search for malicious files (If you selected (M) when running the script for the first time, you must confirm execution again now):

PS C:\Users\Administrator\Downloads> Get-Mailbox -ResultSize Unlimited | .\CVE-2023-23397.ps1 -Environment "Online"

At this point it is mandatory to authenticate again. Output should be similar to the following:

CVE-2023-23397 script version 23.03.15.2119
Trying to find Microsoft.Exchange.WebServices.dll in the script folder
Microsoft.Exchange.WebServices.dll wasn't found - attempting to download it from the internet

Prompting user for authentication, please minimize this window if you do not see an authorization prompt as it may be in the background

Waiting 60 seconds for app credentials to register..

Continuing...
Scanning 1 of 16 mailboxes (currently: mailbox1@yourtenant.com)
Scanning 2 of 16 mailboxes (currently: mailbox2@yourtenant.com)
Scanning 3 of 16 mailboxes (currently: mailbox3@yourtenant.com)
Scanning 4 of 16 mailboxes (currently: mailbox4@yourtenant.com)
Scanning 5 of 16 mailboxes (currently: mailbox5@yourtenant.com)
[...]
Scanning 16 of 16 mailboxes (currently: mailbox16@yourtenant.com)
No vulnerable item found

Do you have feedback regarding the script? Please email ExToolsFeedback@microsoft.com.

I hope you will see the same output as I do. The script also supports deleting affected files. For more information please look at Microsofts script documentation.

After checking the mailboxes, we no longer need the AzureAD Helper Application. To delete the application just run the following command:

PS C:\Users\Administrator\Downloads> .\CVE-2023-23397.ps1 -DeleteAzureApplication

You have probably already guessed: First you have to allow the script again and thereafter you have to authenticate to Microsoft 365 a last time 😉

I hope the explanation helped you to check your tenants. Feel free to let me know if it worked or if you had any problems with it.
bookmark_borderConfiguration: MikroTik routerOS 7 wifiwave2 and CAPsMan

This short blog post shows the configuration needed to use wifiwave2 CAPsManager with multiple APs and multiple networks.

MikroTik removed “capsman forwarding” in wifiwave2 package thus the only option to seperate multiple networks from each other is using VLANs and local forwarding.

CAPsManager configuration:

/interface wifiwave2 configuration
add channel.band=2ghz-ax country=Germany datapath.client-isolation=no name=cap-master-2ghz security.authentication-types=wpa2-psk,wpa3-psk  .passphrase="1234567890" ssid=SSID-TEST
    
    
add channel.band=5ghz-ax country=Germany datapath.client-isolation=no name=cap-master-5ghz security.authentication-types=wpa2-psk,wpa3-psk  .passphrase="1234567890" ssid=SSID-TEST
    
    
add datapath.client-isolation=yes .vlan-id=99 name=cap-slave-guest security.authentication-types=wpa2-psk,wpa3-psk .passphrase="0987654321" ssid=SSID-TEST-GUEST
    
    
/interface wifiwave2
add configuration=cap-master-5ghz disabled=no name=cap-wifi1
add configuration=cap-master-2ghz disabled=no name=cap-wifi2
add configuration=cap-slave-guest disabled=no mac-address=4A:A9:8A:5C:B7:88 master-interface=cap-wifi1 name=cap-wifi3
add configuration=cap-slave-guest disabled=no mac-address=4A:A9:8A:5C:B7:89 master-interface=cap-wifi2 name=cap-wifi4


/interface wifiwave2 capsman
set enabled=yes interfaces=switch


/interface wifiwave2 provisioning
add action=create-enabled comment="hap ax2 01 2ghz" master-configuration=cap-master-2ghz radio-mac=48:A9:8A:5C:B7:89 slave-configurations=cap-slave-guest
add action=create-enabled comment="hap ax2 01 5ghz" master-configuration=cap-master-5ghz radio-mac=48:A9:8A:5C:B7:88 slave-configurations=cap-slave-guest
add action=create-disabled comment="create default disabled"

CAP configuration (hap ax²):

/interface wifiwave2
# managed by CAPsMAN
# mode: AP, SSID: SSID-TEST, channel: 5500/ax/Ceee
set [ find default-name=wifi1 ] configuration.manager=capsman datapath.bridge=switch disabled=no
# managed by CAPsMAN
# mode: AP, SSID: SSID-TEST, channel: 2462/ax/eC
set [ find default-name=wifi2 ] configuration.manager=capsman datapath.bridge=switch disabled=no
/interface wifiwave2 cap
set caps-man-addresses=172.16.254.254 certificate=request enabled=yes slaves-datapath=datapath-slave slaves-static=no
/interface wifiwave2 datapath
add bridge=switch name=datapath-slave

The most important part is to configure the CAP to use the bridge for default wifi (via ‘/interface wifiwave2 set 0,1 datapath.bridge=switch’) and CAPsManager config (via ‘/interface wifiwave2 set 0,1 configuration.manager=capsman’).

If you need additional wifi networks, e.g. for guests you also need to specify the datapath bridge (‘/interface wifiwave2 datapath add bridge=switch name=datapath-slave’) and add this datapath to your cap config (‘/interface wifiwave2 cap set caps-man-addresses=172.16.254.254 certificate=request enabled=yes slaves-datapath=datapath-slave slaves-static=no’). The vlan-id will be not visible on the CAP (at time of writing: routerOS 7.7) but is taken from CAPsManager configuration for the slave network(s).

A more detailed blog post is following soon!

bookmark_borderHowto install extra-packages in MikroTik routerOS 7

MikroTiks routerOS 7.xx has additional packages (e.g. wireless wifiwave2) that can be installed. This short blog post describes the process to add the packages.

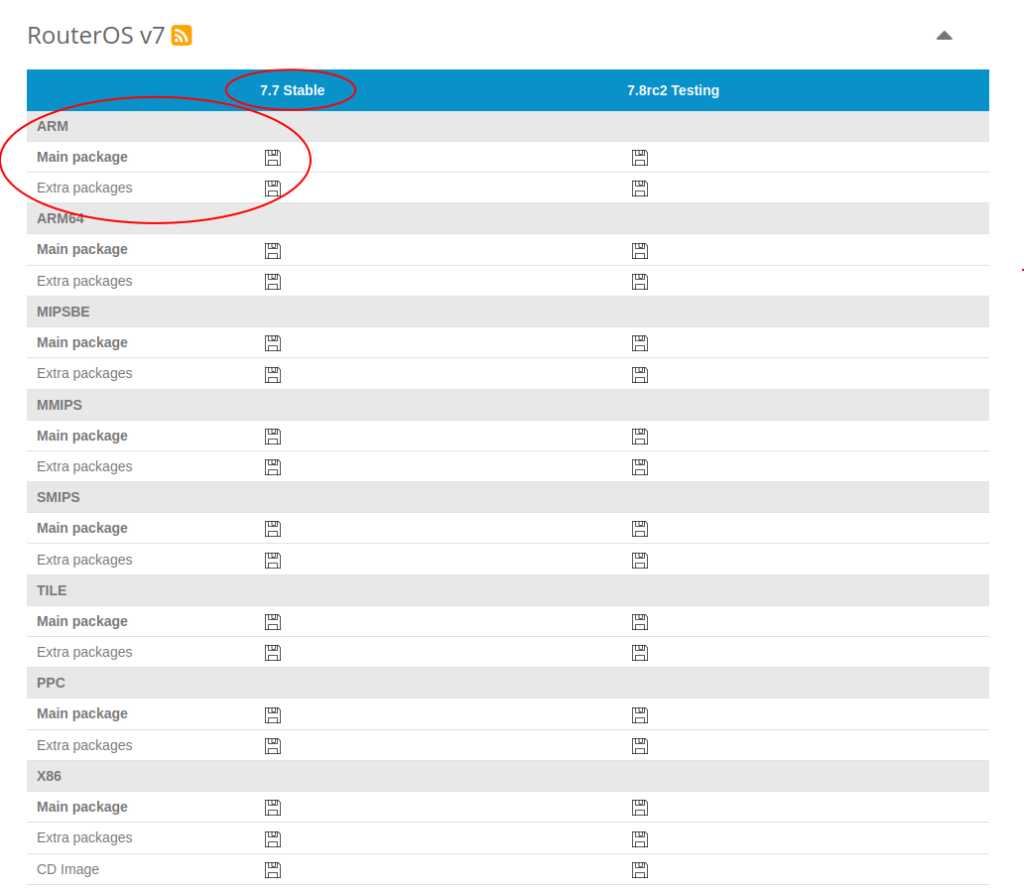
First you need to download the packages from MikroTiks Download page. You need to download the appropriate package for your devices architecture. In my case I am using a RB4011 running routerOS 7.7. In this case I need to look at column ‘7.7 stable’ and row ‘ARM’.

If you don’t know the architecture of your device, there are several ways to find out:

  • Check ‘/system resource print’ in Winbox or CLI and check the ‘cpu’ field
  • Open MikroTiks product matrix and search for your device

After you have downloaded the correct file, open the zip archive and extract the package you want to install. Next, the unzipped file must be uploaded to the router. Either upload it via Winbox or CLI (e.g. scp or ftp) to your device. After the file has been uploaded, just reboot your device.

After the devices has been rebooted, the package is installed automatically. You can check this via ‘/system package print’ in CLI or Winbox as well as the routers log:

[admin@rtr-01] > /log pr
 12:27:10 system,info installed wifiwave2-7.7
 12:27:10 system,info router rebooted

Thats all – you are done and the package has been installed!

bookmark_borderServer 2012r2 / Windows 8.1 KB5022352 error 80070570

Microsoft released the January 2022 patches and for Server 2012r2 and Windows 8.1 patch KB5022352 seems to result in errors while downloading/installing this patch.

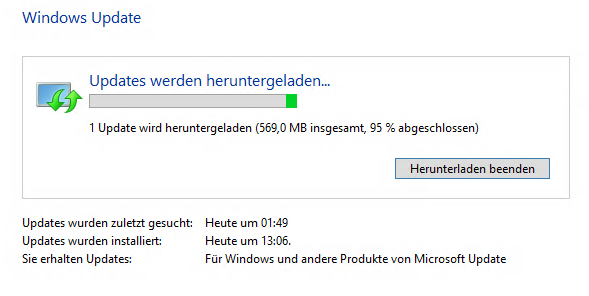
You will most likely notice this, when your Update only gets downloaded until 95% and even after waiting multiple hours nothing changes. If you stopped and restarted the download, it will directly move up to 95% and stay there.

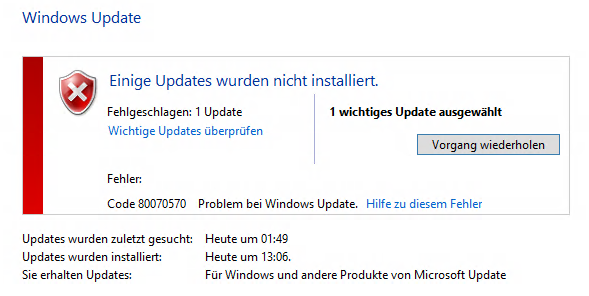
After rebooting the affected machine you will most likely be greeted by the errorcode 80070570.

Many older posts on technet and other sources for general errors with windows update recommend deleting/renaming the windows update catalog folder. In this situation the solution is much more easy:

We tested the above procedure with multiple machines and it seems to solve the errorcode 80070570. Please let me know if that solved the problem for you as well.

bookmark_borderHowto: Deactivate Outlook Roaming Signature

Microsoft is rolling out the new feature called ‘Outlook Roaming Signature’ since the beginning of November 2022. For many users this feature will be very handy but if group mailboxes are configured for multiple different users this will cause confusion and problems.

To disable this feature on one computer a registry key needs to be set:

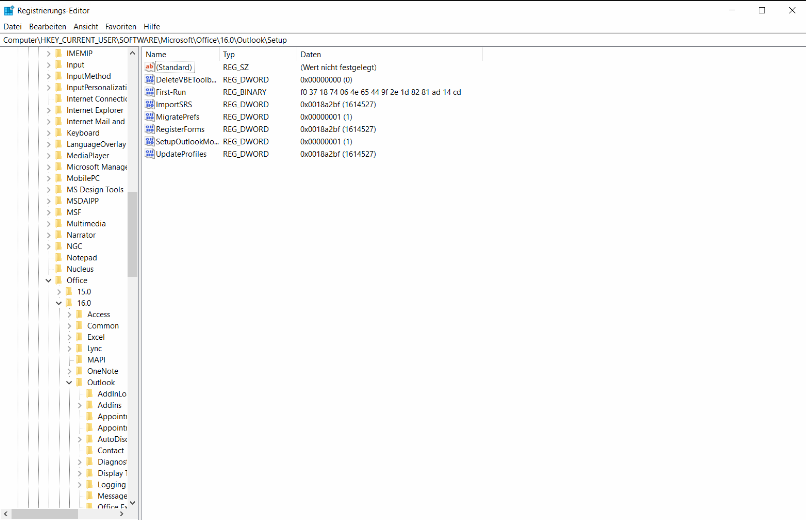
We need to open the registry (regedit) and navigate to the following path:

HKEY_CURRENT_USER\Software\Microsoft\Office\16.0\Outlook\Setup\

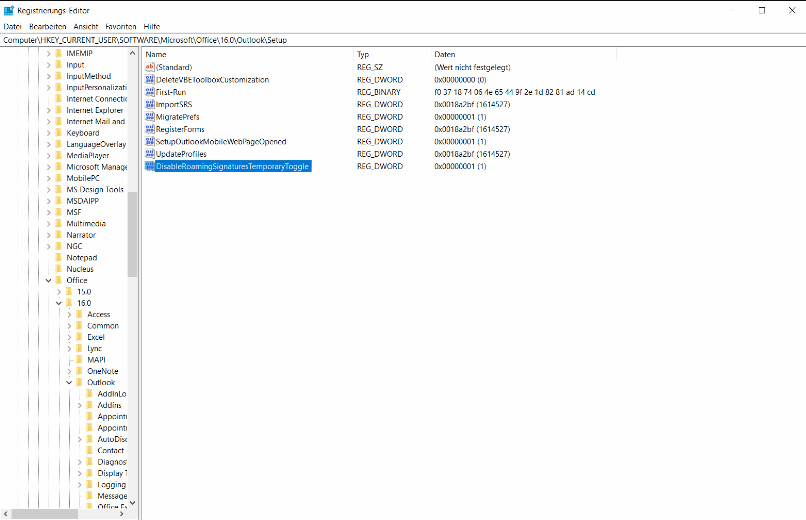
Here we need to create a new DWORD (32bit) with the following name: DisableRoamingSignaturesTemporaryToggle . The value needs to be set to ‘1’

After the value has been set Outlook needs to be restarted. Already made changes to the signature settings are still active. This is why we need to set the signatures once again and this changes shouldn’t be synced to the cloud.


If we need to make these changes to multiple computers we can use GPOs.

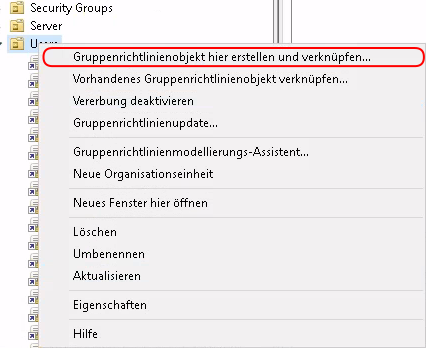
First we need to add a new GPO in our OU and add the correct security groups or users.

Now we highlight the newly added GPO, do a right-click and chose ‘Edit’. Here we need to navigate to the following path:

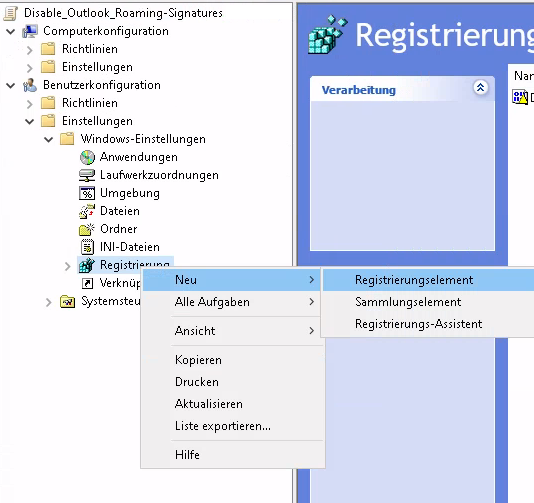
User Configuration -> Preferences -> Windows Settings -> Registry

Right-click on ‘Registry’ and chose ‘New’ -> ‘Registry Item’.

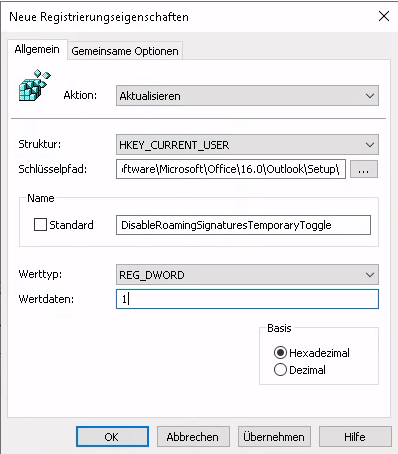
Now we need to set the following:

Action: Update
Hive: HKEY_CURRENT_USER
Key Path: Software\Microsoft\Office\16.0\Outlook\Setup\
Value Name: DisableRoamingSignaturesTemporaryToggle
Value Type: REG_DWORD
Value Data: 1

After the computers have synced the GPOs the setting will be updated. Afterwards Outlook needs to be restarted.

bookmark_borderHowto: Block Windows 11 Upgrade via GPO

Microsoft seems to roll out Windows 11 Upgrades to all Users, even if they have no admin rights on their account. If we want to prevent users from upgrading by mistake, we should make use of a Group Policy Object (GPO).

The Group Policy Object can be set on the following path: Computer configuration -> Administrative Templates -> Windows Components -> Windows Update -> Windows Update for Business. The template is called Select the target Feature Update version.

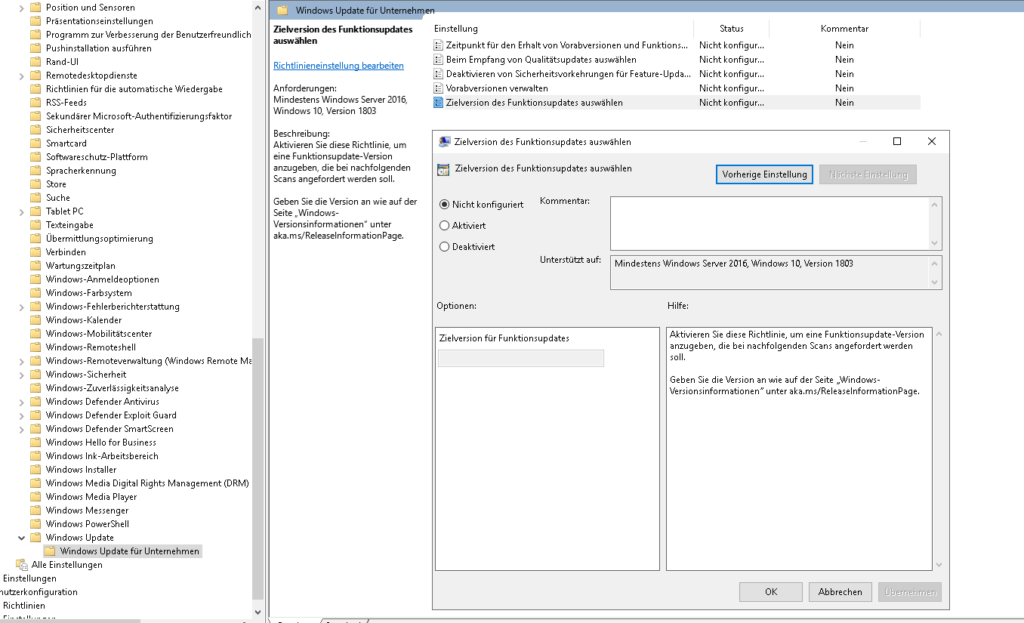
Unfortunately the Group Policy is outdated on Server 2019 and 2022 and is missing the option “Which Windows product version would you like to receive feature updates for”. Since Windows 10 and Windows 11 have the same names for their Feature Updates, we need this option to make sure, we are staying on Windows 10. In Server 2016 we are missing the GPO is even missing completly.

GPO without updated Admx-Template

To get the full options available we need to update our Admx-Templates. You can download the newest version (as of 2022-05-27) from here.

The Admx-Templates need to be extracted to a local file location. After the files have been extracted, open Explorer and navigate to the path: C:\Program Files (x86)\Microsoft Group Policy\Windows 10 November 2021 Update (21H2). Copy the folder “PolicyDefinitions” and paste it to the following UNC-path: \\domain.local\sysvol\domain.local\Policies.

After the files have been copied, open the group policy editor and once again navigate to the path Computer configuration -> Administrative Templates -> Windows Components -> Windows Update -> Windows Update for Business and open the Template “Select the target Feature Update version“.

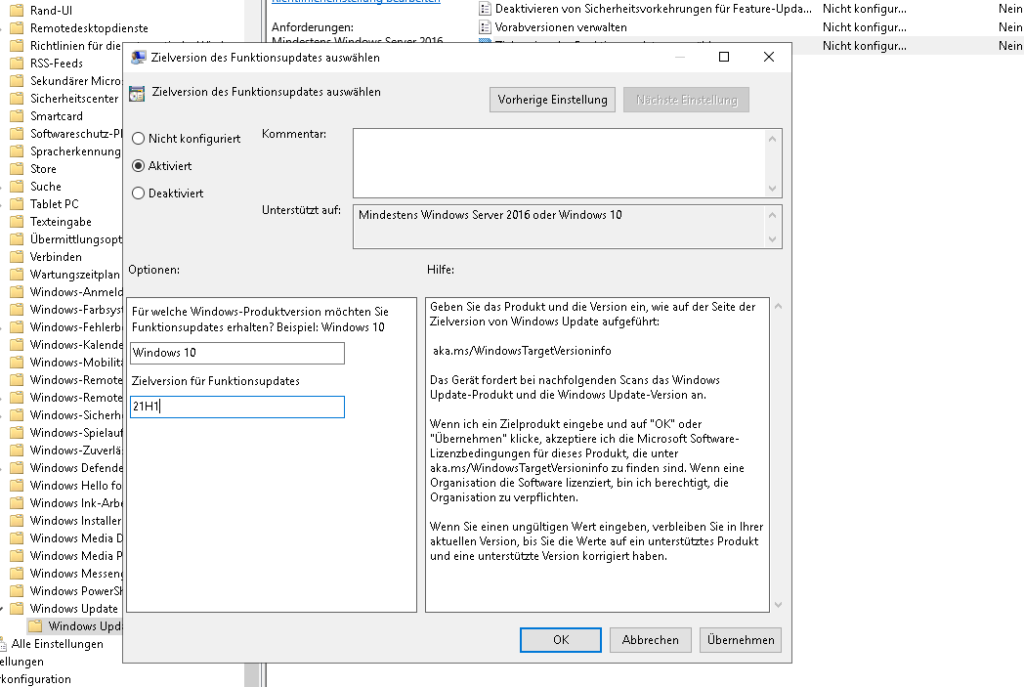
We need to enter “Windows 10” into the first box and “21H2” into the second box.

GPO with updated Admx-Template

Please note: As soon as you want your PCs to upgrade to a newer Feature Update than 21H2 you need to change the value in this GPO. Otherwise the PCs will stay on 21H2.

After the clients have rebootet they should not show any signs of Windows 11 anymore.


Block Windows 11 Upgrade on a single computer without domain

With help of the GPO we can even tell a single computer to not upgrade to Windows 11 (and stop showing us the Windows 11 Upgrade stuff in Windows Updates and in our Taskbar). Just open “gpedit.msc” from Windows Search and navigate to the path Computer configuration -> Administrative Templates -> Windows Components -> Windows Update -> Windows Update for Business and open the Template “Select the target Feature Update version“.

Similar to the GPO for domains we need to enter “Windows 10” in the first and “21H2” into the second box. One reboot later the Windows 11 Upgrade information should be gone.

bookmark_borderHowto disable Azure AD Sync after migration

It comes the day when you finally migrated all your users and mailboxes from onprem to the cloud. This article show the steps needed to disable Azure AD sync from your local domain to Azure AD.

The first step will be to uninstall the Azure AD Sync tool. Uninstall the tool from the server/machine its running on.

In the next step we need to connect to Azure AD via Powershell. This does not work with Linux, that’s why we need a Windows machine. Open Powershell as admin and type the following to install the required cmdlets:

Install-Module -Name MSonline

If you are prompted chose “Y” for yes to install the module.

In the next step we are connecting to Azure AD:

Connect-MsolService

Type in your credentials when the prompt opens and hit Enter.

Now we are going to check whether Azure AD Sync is enabled:

(Get-MsolCompanyInformation).DirectorySynchronizationEnabled

If you receive “True” as answer, Azure AD sync is enabled. If you receive “False” it’s disabled. In the case of “False” you don’t need to do anything further!

Now we are going to disable the synchronization:

Set-MsolDirSyncEnabled -EnableDirSync $false

If we now check the Azure AD Sync status it should show “False”:

(Get-MsolCompanyInformation).DirectorySynchronizationEnabled

bookmark_borderHowto enable DKIM in Microsoft 365

DKIM (Domain Keys Identified Mail) should always be enabled on all of your domains used for email. If you do not enable DKIM your mails may inadvertently get treated as spam. The following tutorial shows you how to enable DKIM for your sending domain(s) in Microsoft365 / Office365.

As the first step we need to connect to our M365 Powershell. The last paragraph in this article describes how to do this.

The following command shows a comprehensive list of DKIM related information for domain “domain.com”:

Get-DkimSigningConfig -Identity domain.com | Format-List

If we just want to check the DKIM status of our domains we can use the following command:

Get-DkimSigningConfig
cmdlet Get-DkimSigningConfig

My example shows that DKIM is enabled for our Microsoft tenant domain but isn’t for our primary sending domain. Before we are able to enable DKIM for our sending domain we need to setup DNS records for verification:

Get-DkimSigningConfig -Identity domain.com | Format-List Selector1CNAME, Selector2CNAME
cmdlet Get-Dkim-SigningConfig

Now we need to set the CNAME records in our dns. Copy selector1 and create a new CNAME entry in your DNS settings. Repeat for selector2 (Destination is just an example, use the output generated in the previous step):

Host: selector1._domainkey
Destination: selector1-domain-com._domainkey.youronmicrosoftdomain.onmicrosoft.com

Host: selector2._domainkey
Destination: selector2-domain-com._domainkey.youronmicrosoftdomain.onmicrosoft.com

At this point we need to wait until the dns records have been propagated. Wait at least 10 – 15 minutes until you proceed. Chose on of the options below:

Option 1: Via Powershell

Open a Powershell session to your M365 tenant and type the following command:

Set-DkimSigningConfig -Identity domain.com -Enabled $true

Option 2: Via Security Admin center

  • Login to M365 Admin center (https://admin.microsoft.com)
  • Go to Security Admin center
  • Go to Threat management -> Policy
  • Click on DKIM
  • Click on your domain
  • Turn the disabled slider to enabled and save

Option 3: Via old Exchange Admin center

  • Login to M365 Admin center (https://admin.microsoft.com)
  • Go to Exchange Admin center
  • Go to Classic Exchange admin center
  • Go to Protection -> dkim
  • Double click your sending domain and click on Enable

If you encounter an error in on of the above steps make sure that your DNS records are set properly. You can check the entries with the following command for Linux:

dig selector1._domainkey.domain.com
dig selector2._domainkey.domain.com

The output should include the CNAME entry for selector1/selector2 you created in your domain name settings. If you are using Windows you can use the following cmd command:

nslookup -q=CNAME selector1._domainkey.domain.com
nslookup -q=CNAME selector2._domainkey.domain.com

Both selectors must be correctly set before Microsoft allows you to enable DKIM for your domain. If both entries are correct wait another 15 -30 minutes and try to enable DKIM via one of the above options again.

bookmark_borderMove a M365 Mailbox to another database server

If you need to move a specific mailbox in Microsoft 365 to a different database server, Powershell is your friend. Open a Powershell session and connect to your Microsoft 365 tenant. If you dont know how to connect to M365 via Powershell, check out the last paragraph in this article: Powershell on Linux

First we should check the actual database server the mailbox is located on:

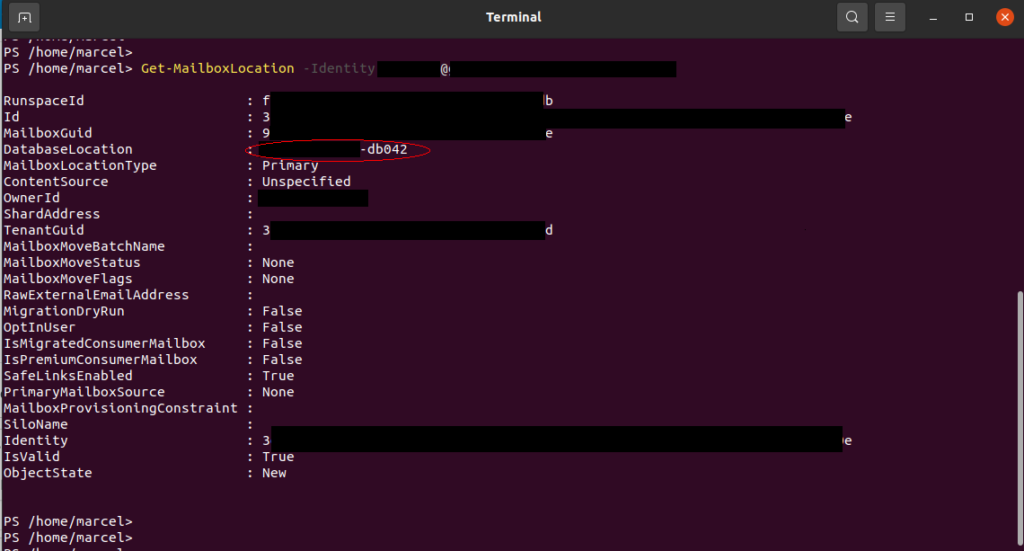
Get-MailboxLocation -Identity user@domain.com
cmdlet Get-MailboxLocation

As you can see in the above image, the field “DatabaseLocation” shows the hostname of our database server. We are now going to set up a move request for this mailbox. In Microsoft 365 / Exchange Online we are not able to chose the desired server we want to move our mailbox to. Microsoft will move the mailbox to a random, different server:

New-MoveRequest -Identity user@domain.com
cmdlet New-MoveRequest

Once we created the move request we need to wait for the moving provess to finish. We are able to check the status with the following command:

Get-MoveRequestStatistics -Identity user@domain.com
cmdlet Get-MoveRequestStatistics, status CreatingFolderHierarchy
cmdlet Get-MoveRequestStatistics, status CopyingMessages

It took this 18GB mailbox about1.5 hours to finish. That depends most likely on the usage of source and destination server. After this operation has finished the user should restart their Outlook.