bookmark_borderHowto: Deactivate Outlook Roaming Signature

Microsoft is rolling out the new feature called ‘Outlook Roaming Signature’ since the beginning of November 2022. For many users this feature will be very handy but if group mailboxes are configured for multiple different users this will cause confusion and problems.

To disable this feature on one computer a registry key needs to be set:

We need to open the registry (regedit) and navigate to the following path:

HKEY_CURRENT_USER\Software\Microsoft\Office.0\Outlook\Setup\
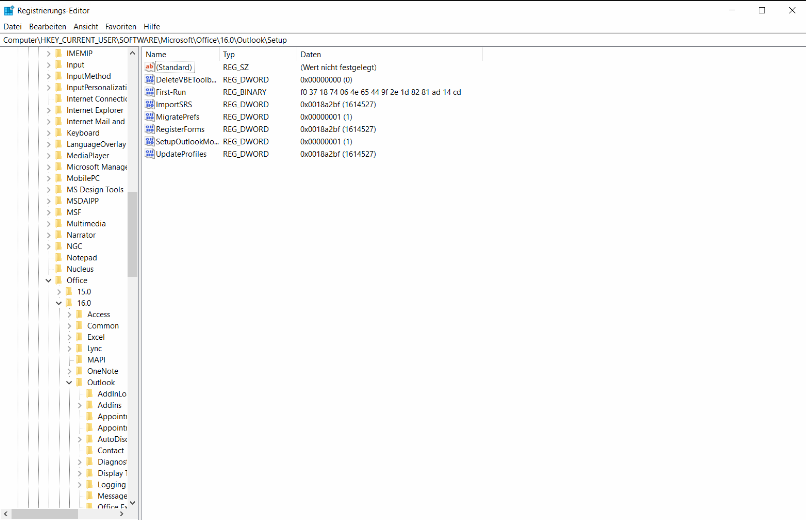
Here we need to create a new DWORD (32bit) with the following name: DisableRoamingSignaturesTemporaryToggle . The value needs to be set to ‘1’
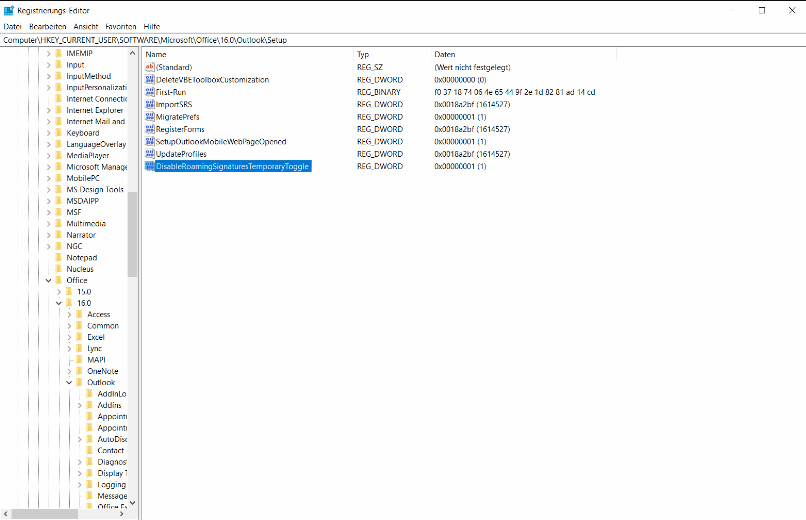
After the value has been set Outlook needs to be restarted. Already made changes to the signature settings are still active. This is why we need to set the signatures once again and this changes shouldn’t be synced to the cloud.


If we need to make these changes to multiple computers we can use GPOs.

First we need to add a new GPO in our OU and add the correct security groups or users.
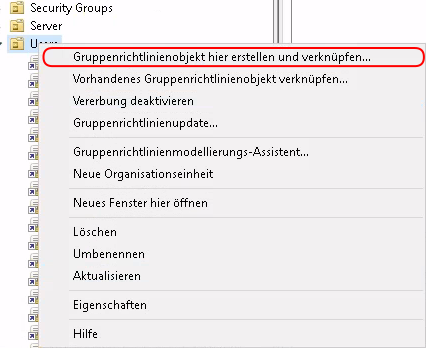
Now we highlight the newly added GPO, do a right-click and chose ‘Edit’. Here we need to navigate to the following path:

User Configuration -> Preferences -> Windows Settings -> Registry

Right-click on ‘Registry’ and chose ‘New’ -> ‘Registry Item’.
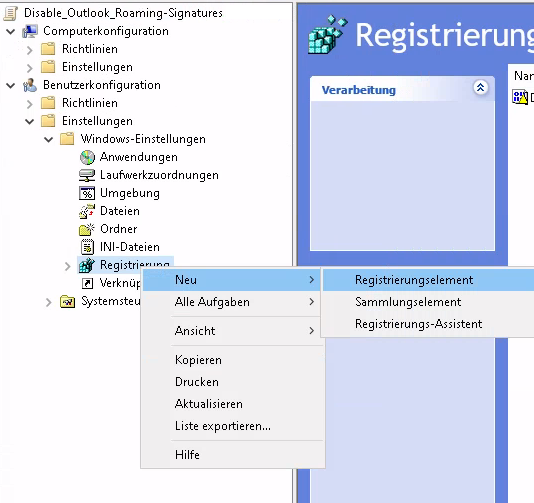
Now we need to set the following:

Action: Update
Hive: HKEY_CURRENT_USER
Key Path: Software\Microsoft\Office.0\Outlook\Setup\
Value Name: DisableRoamingSignaturesTemporaryToggle
Value Type: REG_DWORD
Value Data: 1
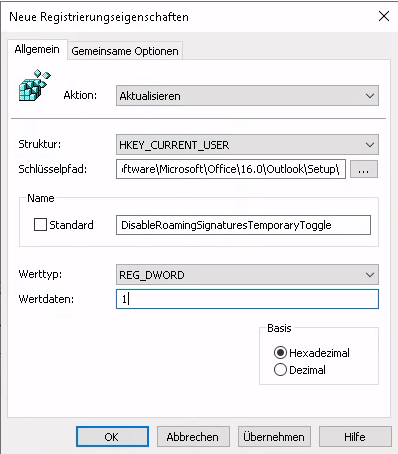
After the computers have synced the GPOs the setting will be updated. Afterwards Outlook needs to be restarted.

bookmark_borderHowto disable Azure AD Sync after migration

It comes the day when you finally migrated all your users and mailboxes from onprem to the cloud. This article show the steps needed to disable Azure AD sync from your local domain to Azure AD.

The first step will be to uninstall the Azure AD Sync tool. Uninstall the tool from the server/machine its running on.

In the next step we need to connect to Azure AD via Powershell. This does not work with Linux, that’s why we need a Windows machine. Open Powershell as admin and type the following to install the required cmdlets:

Install-Module -Name MSonline

If you are prompted chose “Y” for yes to install the module.

In the next step we are connecting to Azure AD:

Connect-MsolService

Type in your credentials when the prompt opens and hit Enter.

Now we are going to check whether Azure AD Sync is enabled:

(Get-MsolCompanyInformation).DirectorySynchronizationEnabled

If you receive “True” as answer, Azure AD sync is enabled. If you receive “False” it’s disabled. In the case of “False” you don’t need to do anything further!

Now we are going to disable the synchronization:

Set-MsolDirSyncEnabled -EnableDirSync $false

If we now check the Azure AD Sync status it should show “False”:

(Get-MsolCompanyInformation).DirectorySynchronizationEnabled

bookmark_borderHowto enable DKIM in Microsoft 365

DKIM (Domain Keys Identified Mail) should always be enabled on all of your domains used for email. If you do not enable DKIM your mails may inadvertently get treated as spam. The following tutorial shows you how to enable DKIM for your sending domain(s) in Microsoft365 / Office365.

As the first step we need to connect to our M365 Powershell. The last paragraph in this article describes how to do this.

The following command shows a comprehensive list of DKIM related information for domain “domain.com”:

Get-DkimSigningConfig -Identity domain.com | Format-List

If we just want to check the DKIM status of our domains we can use the following command:

Get-DkimSigningConfig
cmdlet Get-DkimSigningConfig

My example shows that DKIM is enabled for our Microsoft tenant domain but isn’t for our primary sending domain. Before we are able to enable DKIM for our sending domain we need to setup DNS records for verification:

Get-DkimSigningConfig -Identity domain.com | Format-List Selector1CNAME, Selector2CNAME
cmdlet Get-Dkim-SigningConfig

Now we need to set the CNAME records in our dns. Copy selector1 and create a new CNAME entry in your DNS settings. Repeat for selector2 (Destination is just an example, use the output generated in the previous step):

Host: selector1._domainkey
Destination: selector1-domain-com._domainkey.youronmicrosoftdomain.onmicrosoft.com

Host: selector2._domainkey
Destination: selector2-domain-com._domainkey.youronmicrosoftdomain.onmicrosoft.com

At this point we need to wait until the dns records have been propagated. Wait at least 10 – 15 minutes until you proceed. Chose on of the options below:

Option 1: Via Powershell

Open a Powershell session to your M365 tenant and type the following command:

Set-DkimSigningConfig -Identity domain.com -Enabled $true

Option 2: Via Security Admin center

  • Login to M365 Admin center (https://admin.microsoft.com)
  • Go to Security Admin center
  • Go to Threat management -> Policy
  • Click on DKIM
  • Click on your domain
  • Turn the disabled slider to enabled and save

Option 3: Via old Exchange Admin center

  • Login to M365 Admin center (https://admin.microsoft.com)
  • Go to Exchange Admin center
  • Go to Classic Exchange admin center
  • Go to Protection -> dkim
  • Double click your sending domain and click on Enable

If you encounter an error in on of the above steps make sure that your DNS records are set properly. You can check the entries with the following command for Linux:

dig selector1._domainkey.domain.com
dig selector2._domainkey.domain.com

The output should include the CNAME entry for selector1/selector2 you created in your domain name settings. If you are using Windows you can use the following cmd command:

nslookup -q=CNAME selector1._domainkey.domain.com
nslookup -q=CNAME selector2._domainkey.domain.com

Both selectors must be correctly set before Microsoft allows you to enable DKIM for your domain. If both entries are correct wait another 15 -30 minutes and try to enable DKIM via one of the above options again.

bookmark_borderMove a M365 Mailbox to another database server

If you need to move a specific mailbox in Microsoft 365 to a different database server, Powershell is your friend. Open a Powershell session and connect to your Microsoft 365 tenant. If you dont know how to connect to M365 via Powershell, check out the last paragraph in this article: Powershell on Linux

First we should check the actual database server the mailbox is located on:

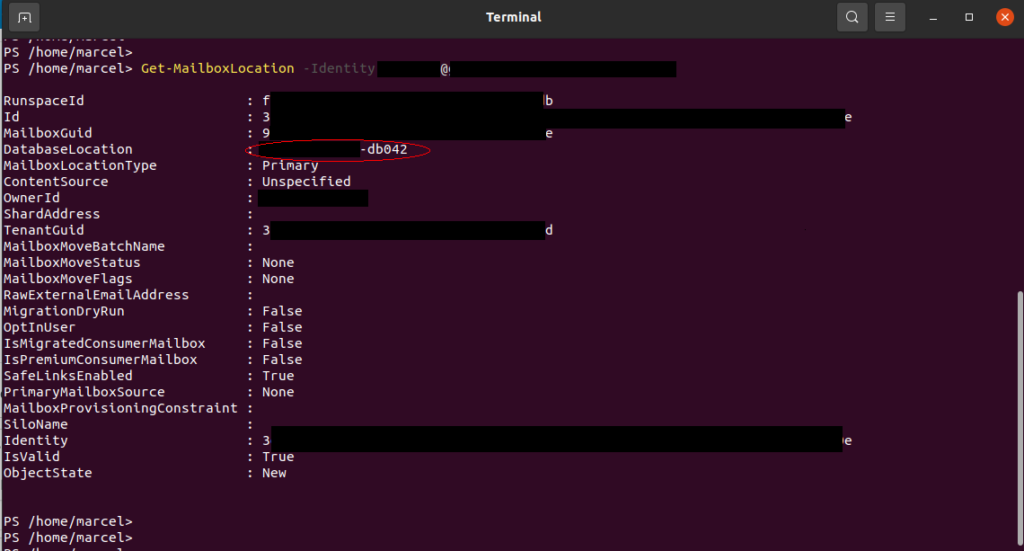
Get-MailboxLocation -Identity user@domain.com
cmdlet Get-MailboxLocation

As you can see in the above image, the field “DatabaseLocation” shows the hostname of our database server. We are now going to set up a move request for this mailbox. In Microsoft 365 / Exchange Online we are not able to chose the desired server we want to move our mailbox to. Microsoft will move the mailbox to a random, different server:

New-MoveRequest -Identity user@domain.com
cmdlet New-MoveRequest

Once we created the move request we need to wait for the moving provess to finish. We are able to check the status with the following command:

Get-MoveRequestStatistics -Identity user@domain.com
cmdlet Get-MoveRequestStatistics, status CreatingFolderHierarchy
cmdlet Get-MoveRequestStatistics, status CopyingMessages

It took this 18GB mailbox about1.5 hours to finish. That depends most likely on the usage of source and destination server. After this operation has finished the user should restart their Outlook.

bookmark_borderPowershell on Linux

Did you know Powershell is available for Linux too? Sometimes you need the Windows Powershell features available on your Linux machine, e.g. for M365, Exchange Online or Azure AD administration. Powershell can be easily installed but not all features are available.

Linux derivates officially supported for Powershell 7.1:

  • Ubuntu 16.04/18.04/20.04
  • Ubuntu 19.10 (via snap-packages)
  • Debian 9/10
  • CentOS/RHEL 7/8
  • Fedora 30
  • Alpine (from 3.11)

Installation example (Ubuntu 20.04)

You can directly install Powershell via repository:

# Update the list of packages
sudo apt-get update
# Install pre-requisite packages.
sudo apt-get install -y wget apt-transport-https software-properties-common
# Download the Microsoft repository GPG keys
wget -q https://packages.microsoft.com/config/ubuntu/20.04/packages-microsoft-prod.deb
# Register the Microsoft repository GPG keys
sudo dpkg -i packages-microsoft-prod.deb
# Update the list of products
sudo apt-get update
# Enable the "universe" repositories
sudo add-apt-repository universe
# Install PowerShell
sudo apt-get install -y powershell
# Start PowerShell
pwsh

Connect to Office 365 Powershell

After Powershell has been installed, it’s very easy to connect to Office 365. Open the Powershell terminal and type the following (First step will ask for O365 admin credentials)

$O365Credential = Get-Credential

$Session = New-PSSession -ConfigurationName Microsoft.Exchange -ConnectionUri https://outlook.office365.com/powershell-liveid/ -Credential $O365Credential -Authentication Basic -AllowRedirection

Import-PSSession -Session $Session

The last step takes a few seconds until the Office 365 session has been imported. Afterwards you can run the available Powershell cmdlets.